
How To Prepare Your Home for Mold Remediation Services
A technician prepares the workspace by establishing containment barriers and using specialized equipment to ensure thorough mold removal.
Why Proper Preparation for Mold Remediation Matters
Mold remediation is a professional process designed to safely remove mold contamination and correct the moisture conditions that allow it to grow. Unlike simple surface cleaning or DIY mold sprays, true remediation involves containment, controlled removal of affected materials, specialized cleaning methods, and air filtration to prevent mold spores from spreading throughout the home. Homeowners usually seek remediation after noticing visible mold, persistent musty odors, water damage, or unexplained health symptoms such as coughing, congestion, or headaches.
Thorough preparation by the homeowner plays a major role in how smoothly and successfully a remediation project goes.Preparing the space in advance helps technicians work efficiently, reduces the risk of cross-contamination, protects belongings, and can even shorten the overall timeline and cost. Think of preparation as a partnership: the remediation company handles the technical work, while the homeowner ensures the space and household are ready.
A typical mold remediation project includes inspection, containment setup, removal of contaminated materials, detailed cleaning, air filtration, and sometimes clearance testing. The length of the job can range from a day or two for small areas to a week or more for extensive contamination. There may be noise, restricted access to rooms, and temporary disruption to daily routines. Knowing what to expect and preparing in advance makes the experience far less stressful.
This guide walks you through understanding your mold problem, communicating with your remediation company, protecting your family, preparing each area of your home, and planning for life during and after remediation. It’s meant to be practical and step-by-step, so you can use it as a checklist and feel confident when the crew arrives.
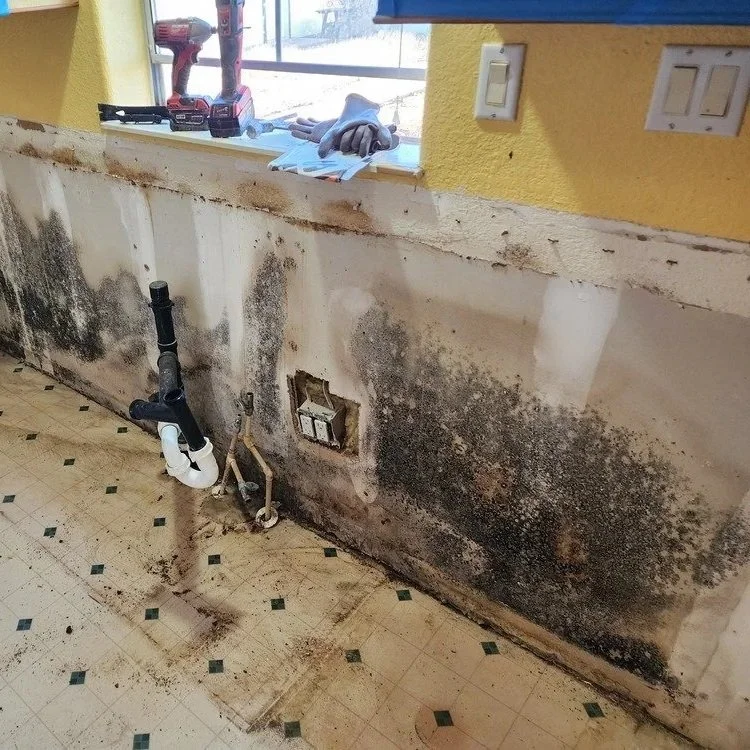
Understand the Scope of Your Mold Problem
Before you start moving furniture or packing boxes, review any mold inspection or assessment report you’ve received. These reports typically identify where mold was found, what materials are affected, and what areas need remediation. Highlight specific rooms, walls, ceilings, or structural elements mentioned, and make note of any confusing terms so you can ask for clarification.
Create a simple list or map of affected areas in your home. Walk through each space and compare it to the report so you fully understand what will be worked on. Identifying affected materials—such as drywall, carpeting, cabinets, or insulation—helps you know what might need to be moved, covered, or discarded.
It’s also important to understand that not all mold is visible. A small patch on a wall can signal hidden contamination behind drywall or under flooring. Once demolition begins, additional mold may be discovered. Talk with your contractor about how changes in scope will be communicated and approved so there are no surprises.
Finally, make sure you receive a written scope of work from the remediation company. This should outline what areas will be treated, what materials will be removed, what cleaning methods will be used, and whether post-remediation testing is included. Review it carefully and ask questions until you feel comfortable with what will happen in each room.
Communicate With Your Mold Remediation Company
Clear communication prevents delays and misunderstandings. Ask your remediation company what preparation steps they expect you to complete before the crew arrives. Some companies move furniture and disconnect appliances; others expect the homeowner to handle that in advance. Getting a written prep checklist is ideal.
Discuss where containment barriers and access points will be placed and which rooms or hallways will be temporarily blocked off. This helps you plan alternate routes through the home and avoid disturbing work zones.
Confirm the start date, estimated completion date, and daily working hours. Ask who your main point of contact will be and how updates will be provided. Also, review safety measures such as personal protective equipment, air filtration, and how waste will be removed from the home. A reputable company should be happy to explain all of this in plain language.
Protect Your Family’s Health and Plan Living Arrangements
One of the first decisions to make is whether your family will stay in the home during remediation or relocate temporarily. This depends on the size of the affected area, whether bedrooms or main living spaces are involved, and any existing health concerns. Some projects allow partial occupancy; others make the home uncomfortable or unsafe for certain people.
Infants, young children, older adults, pregnant individuals, and anyone with asthma or a weakened immune system are more sensitive to mold and cleaning chemicals. In many cases, professionals recommend that vulnerable household members avoid the home until work is complete.
Pets also need planning. The noise, strangers, and equipment can stress animals, and they may interfere with containment barriers. Boarding pets, having them stay with friends, or confining them to a sealed-off, clean area are common solutions.
Finally, prepare for temporary changes to daily routines. Kitchens, bathrooms, and bedrooms may be off-limits for periods of time. Setting up temporary cooking, sleeping, or work areas in advance makes the disruption easier to manage.
Handle Insurance, Documentation, and Legal Considerations
Contact your homeowner’s insurance provider as soon as mold is discovered or remediation is proposed. Coverage varies widely depending on policy type and cause of the mold. Ask what documentation is required, what costs are covered, and whether temporary relocation expenses are reimbursable.
Document everything. Take photos and videos of visible mold, water stains, and damaged materials before work begins. Keep notes about when problems started, any leaks or floods, and all professional assessments.
Request and save all remediation paperwork, including estimates, contracts, daily notes, invoices, and before-and-after photos. In some areas, local regulations or disclosure laws apply to mold issues, especially when selling or renting a property. Understanding these requirements helps protect your legal and financial interests.
Declutter and Clear the Affected Areas
Decluttering is one of the most important preparation steps. Remove non-essential items like decor, clothes, toys, and small furniture from remediation zones. The more open the workspace, the faster and safer the job will go.
Decide what to keep, clean, or discard. Porous items such as cardboard, upholstered furniture, and some textiles may not be salvageable if they’re heavily contaminated. Non-porous items like glass and metal are easier to clean. Consult your contractor about questionable belongings, especially those with sentimental or high monetary value.
Pack removed items in labeled boxes or bins and store them in a clean, dry area away from the work zone. Clear hallways and doorways so technicians can move equipment safely and efficiently.
Prepare Furniture, Floors, and Belongings
Move furniture away from mold-affected walls and surfaces to allow full access. Check items for visible mold or musty odors as you move them. If anything seems contaminated, discuss it with the remediation team.
Cover remaining items with plastic sheeting to protect them from dust and airborne spores. Pay special attention to electronics, bookshelves, and delicate items.
Protect floors in high-traffic paths using cardboard, rosin paper, or temporary floor coverings. Remove valuables and fragile items from nearby areas and store them securely. Taking these precautions prevents secondary damage during an already disruptive process.
Prepare Kitchens, Bathrooms, and Utility Areas
Clear countertops, cabinets, and shelves in affected kitchens. Remove dishes, small appliances, and food items so technicians can access walls and cabinets. If the kitchen will be inaccessible, set up a temporary cooking area elsewhere.
Bathrooms with mold problems may be completely off-limits. Remove toiletries, towels, and shower curtains, and plan which alternative bathroom will be used.
Laundry rooms and utility spaces often house moisture sources. Clear detergents and supplies, and ask how appliances will be handled if mold is present around them. Be prepared for temporary water, power, or HVAC disruptions and plan accordingly.
Prepare Bedrooms, Living Areas, and HVAC Systems
Remove bedding, curtains, rugs, and soft furnishings from affected bedrooms. Wash what you can in hot water and store clean items in sealed bins. Set up temporary sleeping arrangements if needed.
Protect electronics and home office equipment by moving or covering them, and back up important data in advance. Take down wall hangings and decorative items that could interfere with containment or be damaged by vibration.
Discuss HVAC involvement with your remediation company. Systems can spread spores if not managed properly. Ask whether vents will be sealed, ducts cleaned, or the system shut down temporarily.
Final Steps Before and During Remediation
The day before remediation, complete all decluttering and confirm the schedule, access instructions, and parking arrangements. Secure pets and make sure family members remove any personal items they’ll need for the day from affected areas.
Expect noise, dust, and limited access once work begins. Plan errands or activities outside the home if possible during the loudest phases.
During the project, communicate regularly with the crew leader, avoid entering containment zones, and be prepared for potential changes in scope if hidden mold is discovered.
After Remediation: Inspection and Prevention
Once work is complete, walk through the affected areas with the contractor. Review what was done, ask questions, and collect all documentation.
Consider post-remediation verification testing, especially for large projects or health-sensitive households. Clean surrounding areas with HEPA vacuuming and damp wiping, and bring stored belongings back gradually.
Address moisture control issues such as leaks, ventilation problems, or high humidity. Long-term mold prevention depends on keeping moisture under control.
Conclusion
Preparing your home for mold remediation requires time and effort, but it pays off in smoother project execution, better protection of belongings, and improved safety for your family. Understanding the scope of the problem, communicating clearly with your remediation company, protecting health, and carefully preparing each room all work together to ensure success.
Mold remediation is not just about removing what you can see. It’s about restoring a healthy living environment and preventing future growth. With thoughtful preparation, professional support, and ongoing moisture management, you can move forward with confidence and peace of mind.
FAQs
Start by reviewing your inspection report, contacting a qualified remediation company, and planning for decluttering and protecting affected areas. Contact your insurance provider early and consider health risks for family members.
It depends on the size and location of the affected areas and the health of occupants. Your remediation company can help you decide whether staying is safe and practical.
Sort items into those that can likely be cleaned, those needing specialized treatment, and those that are best discarded. Consult your contractor about valuable or sentimental items and document losses for insurance.
Address moisture sources, maintain proper ventilation and humidity, and monitor high-risk areas. Post-remediation testing, regular inspections, and quick response to leaks all help prevent recurrence.